狂神 —— Docker 学习笔记(一)
2025年08月27日 Tags: Server
只要学不死,就往死里学。 —— 狂神 🤷♀️
几个概念
- Image:镜像
- Container:容器
- Docker Hub:镜像仓库地址(可以看作类似 GitHub 的仓库,用来远程存储镜像的,用途不同而已)
安装 Docker
预先准备
这里我们在 Linux 系统安装 Docker Engine,官方推荐使用 Centos 9(Stream),但买的阿里云轻量服务器不支持啊,用的 Centos 8,也可以安装,就是不维护了好像。
查看系统内核 uname -r
查看系统版本 cat /etc/os-release
[root@iZ2ze41p5bh3hk80pucxofZ ~]# cat /etc/os-release
NAME="CentOS Linux"
VERSION="8 (Core)"
ID="centos"
ID_LIKE="rhel fedora"
VERSION_ID="8"
PLATFORM_ID="platform:el8"
PRETTY_NAME="CentOS Linux 8 (Core)"
ANSI_COLOR="0;31"
CPE_NAME="cpe:/o:centos:centos:8"
HOME_URL="https://www.centos.org/"
BUG_REPORT_URL="https://bugs.centos.org/"

CENTOS_MANTISBT_PROJECT="CentOS-8"
CENTOS_MANTISBT_PROJECT_VERSION="8"
REDHAT_SUPPORT_PRODUCT="centos"
REDHAT_SUPPORT_PRODUCT_VERSION="8"
安装
(1)移除旧的安装包 如果之前有安装过 Docker 或者系统自带的,需要删除之前的安装包,避免冲突。
sudo dnf remove docker \
                docker-client \
                docker-client-latest \
                docker-common \
                docker-latest \
                docker-latest-logrotate \
                docker-logrotate \
                docker-engine
(2)配置镜像仓库 这里推荐使用阿里云的镜像仓库,不要使用官方的,国外的会导致镜像拉取不下来。
sudo dnf -y install dnf-plugins-core # dnf 是包管理器
配置阿里云镜像:
登录阿里云控制台-->容器镜像服务,按说明配置即可。
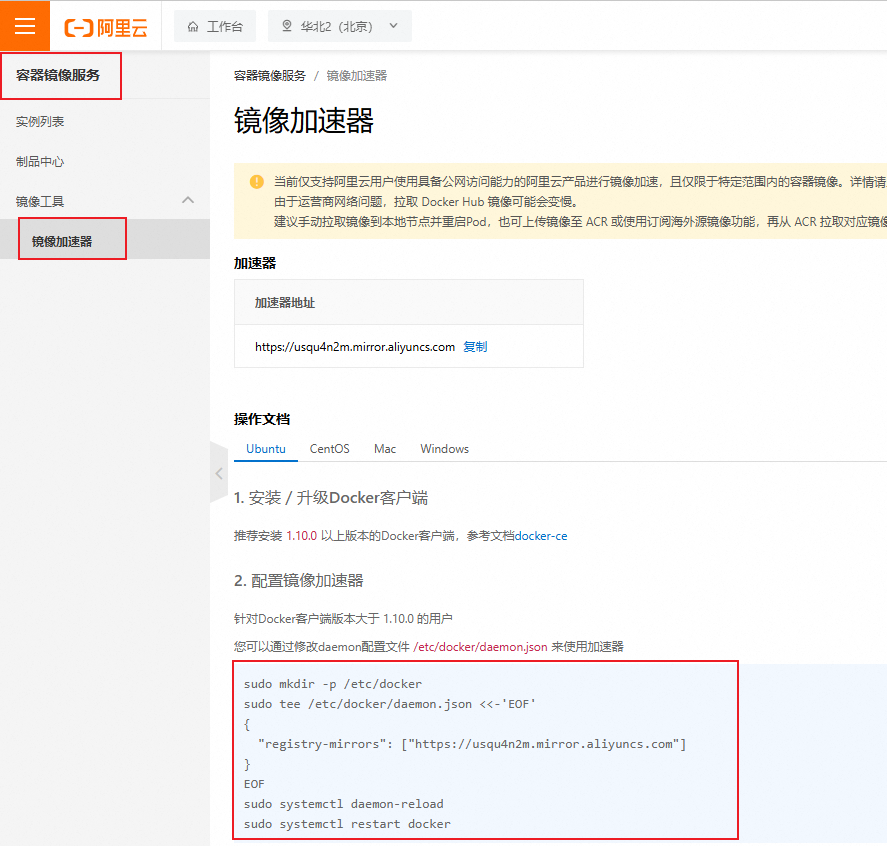 参考:
阿里云 官方镜像加速
参考:
阿里云 官方镜像加速
(3)启动 Docker Engine
# 手动启动
sudo systemctl start docker

# 开机自启
sudo systemctl enable --now docker
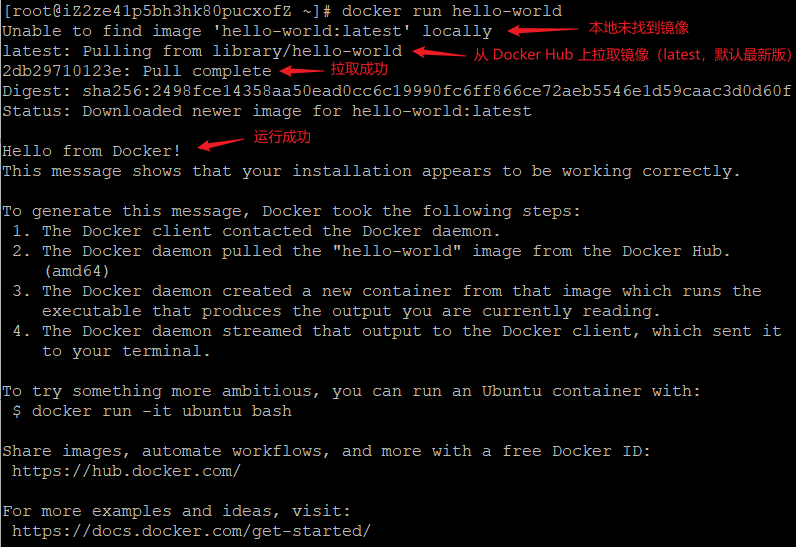
(4)测试
sudo docker run hello-world
这里使用 run 命令运行镜像 hello-world 进行测试。(过程:先在本机找有没有这个镜像,没有再去 Docker Hub 上找,找到后拉取到本机并运行,如果 Docker Hub 上也没有找到,则报错找不到镜像)
(5)卸载 Docker Engine
# 删除安装包
sudo dnf remove docker-ce docker-ce-cli containerd.io docker-buildx-plugin docker-compose-plugin docker-ce-rootless-extras
# 移除 images、containers、volumes 和自定义配置文件
sudo rm -rf /var/lib/docker
sudo rm -rf /var/lib/containerd
Docker 原理
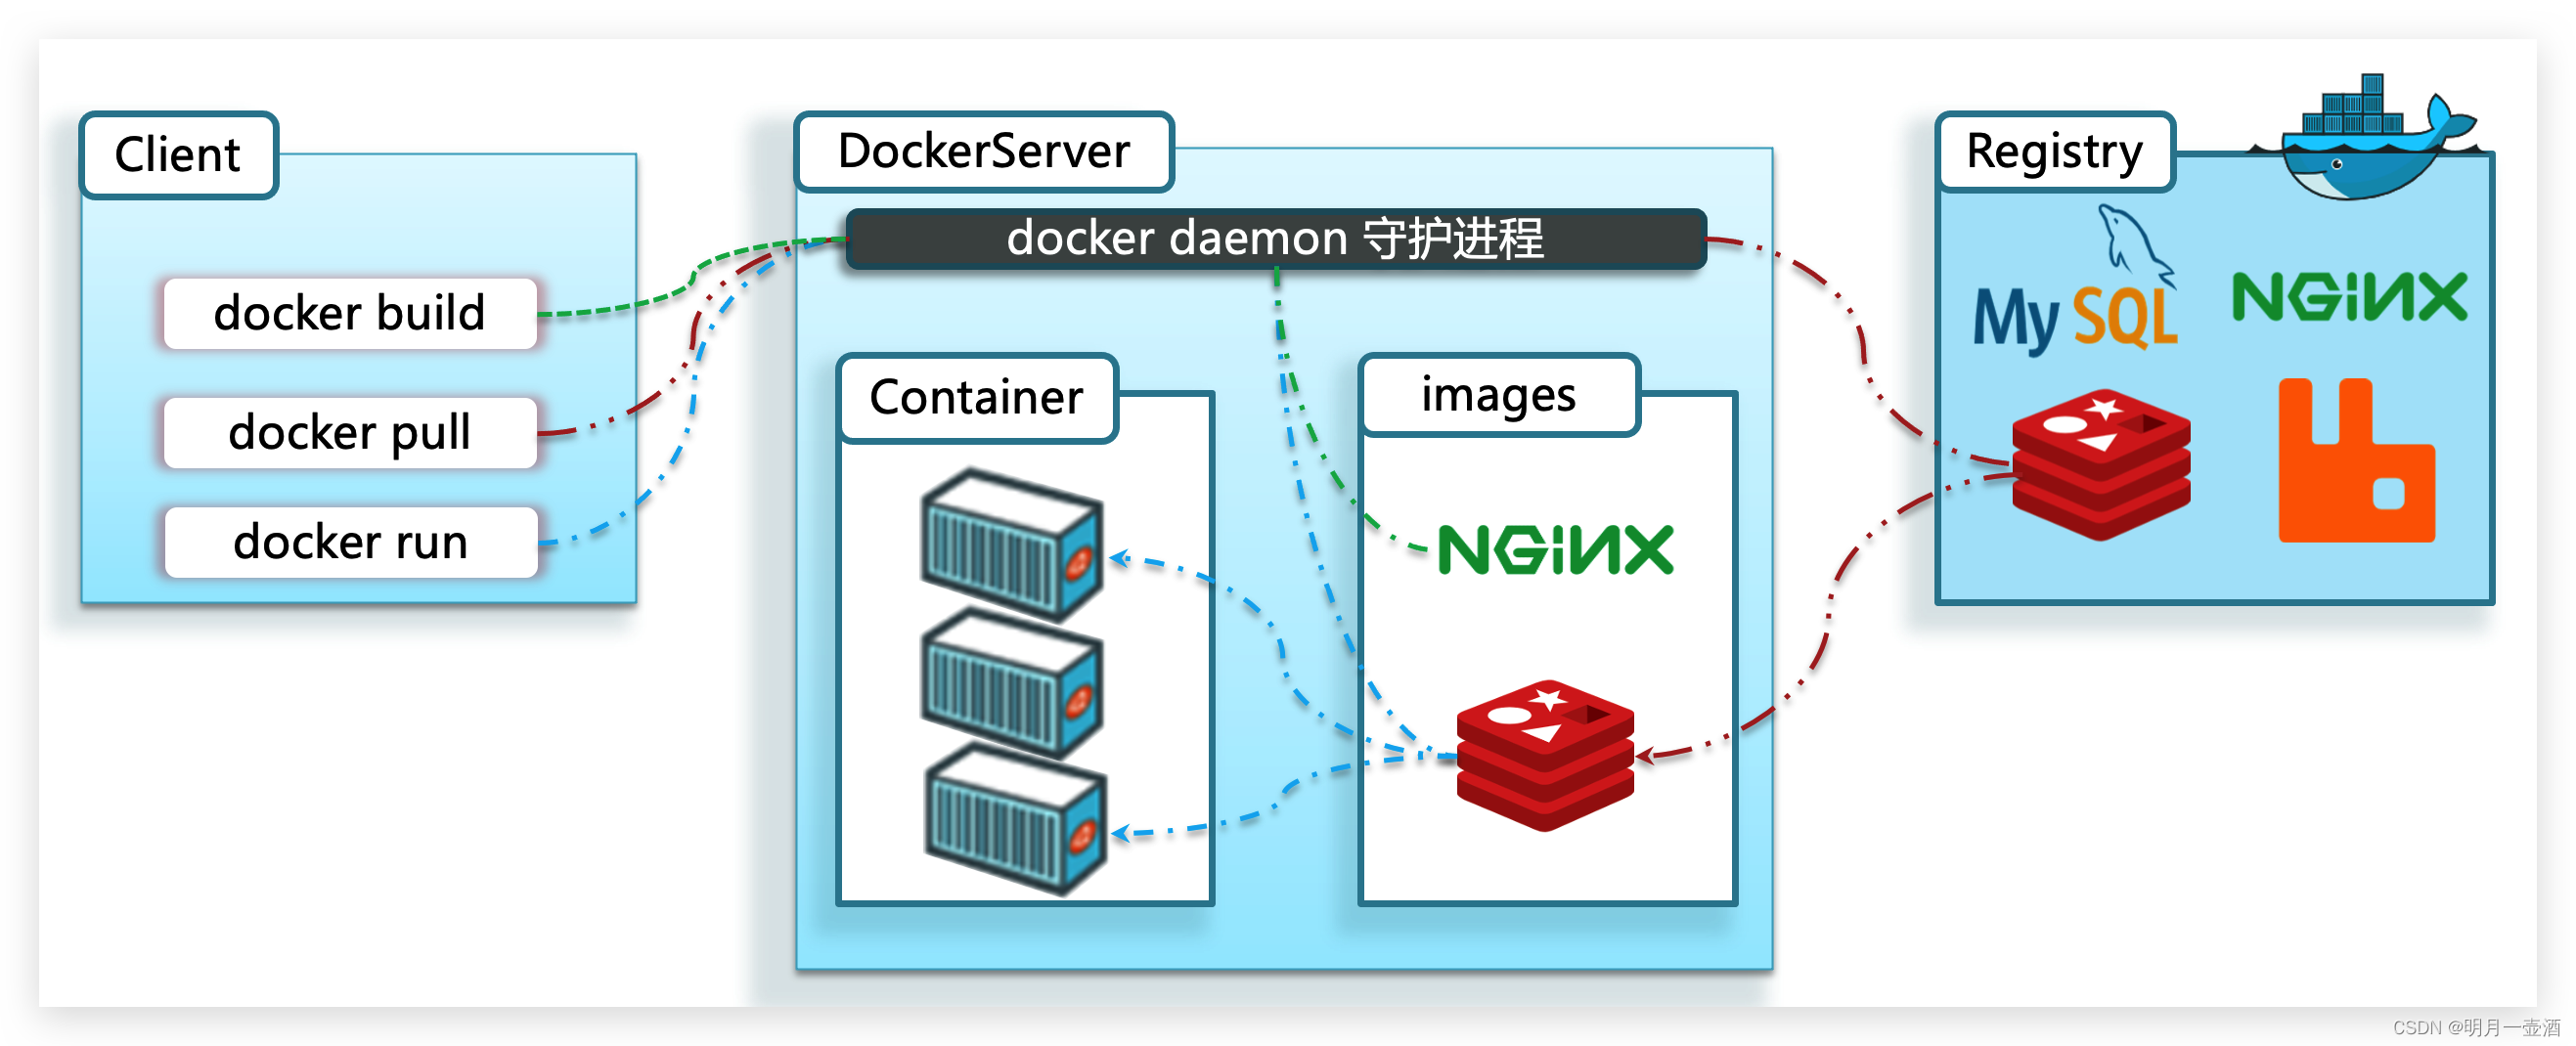
Docker 和 VM(虚拟机)的区别,Docker 为什么更快?
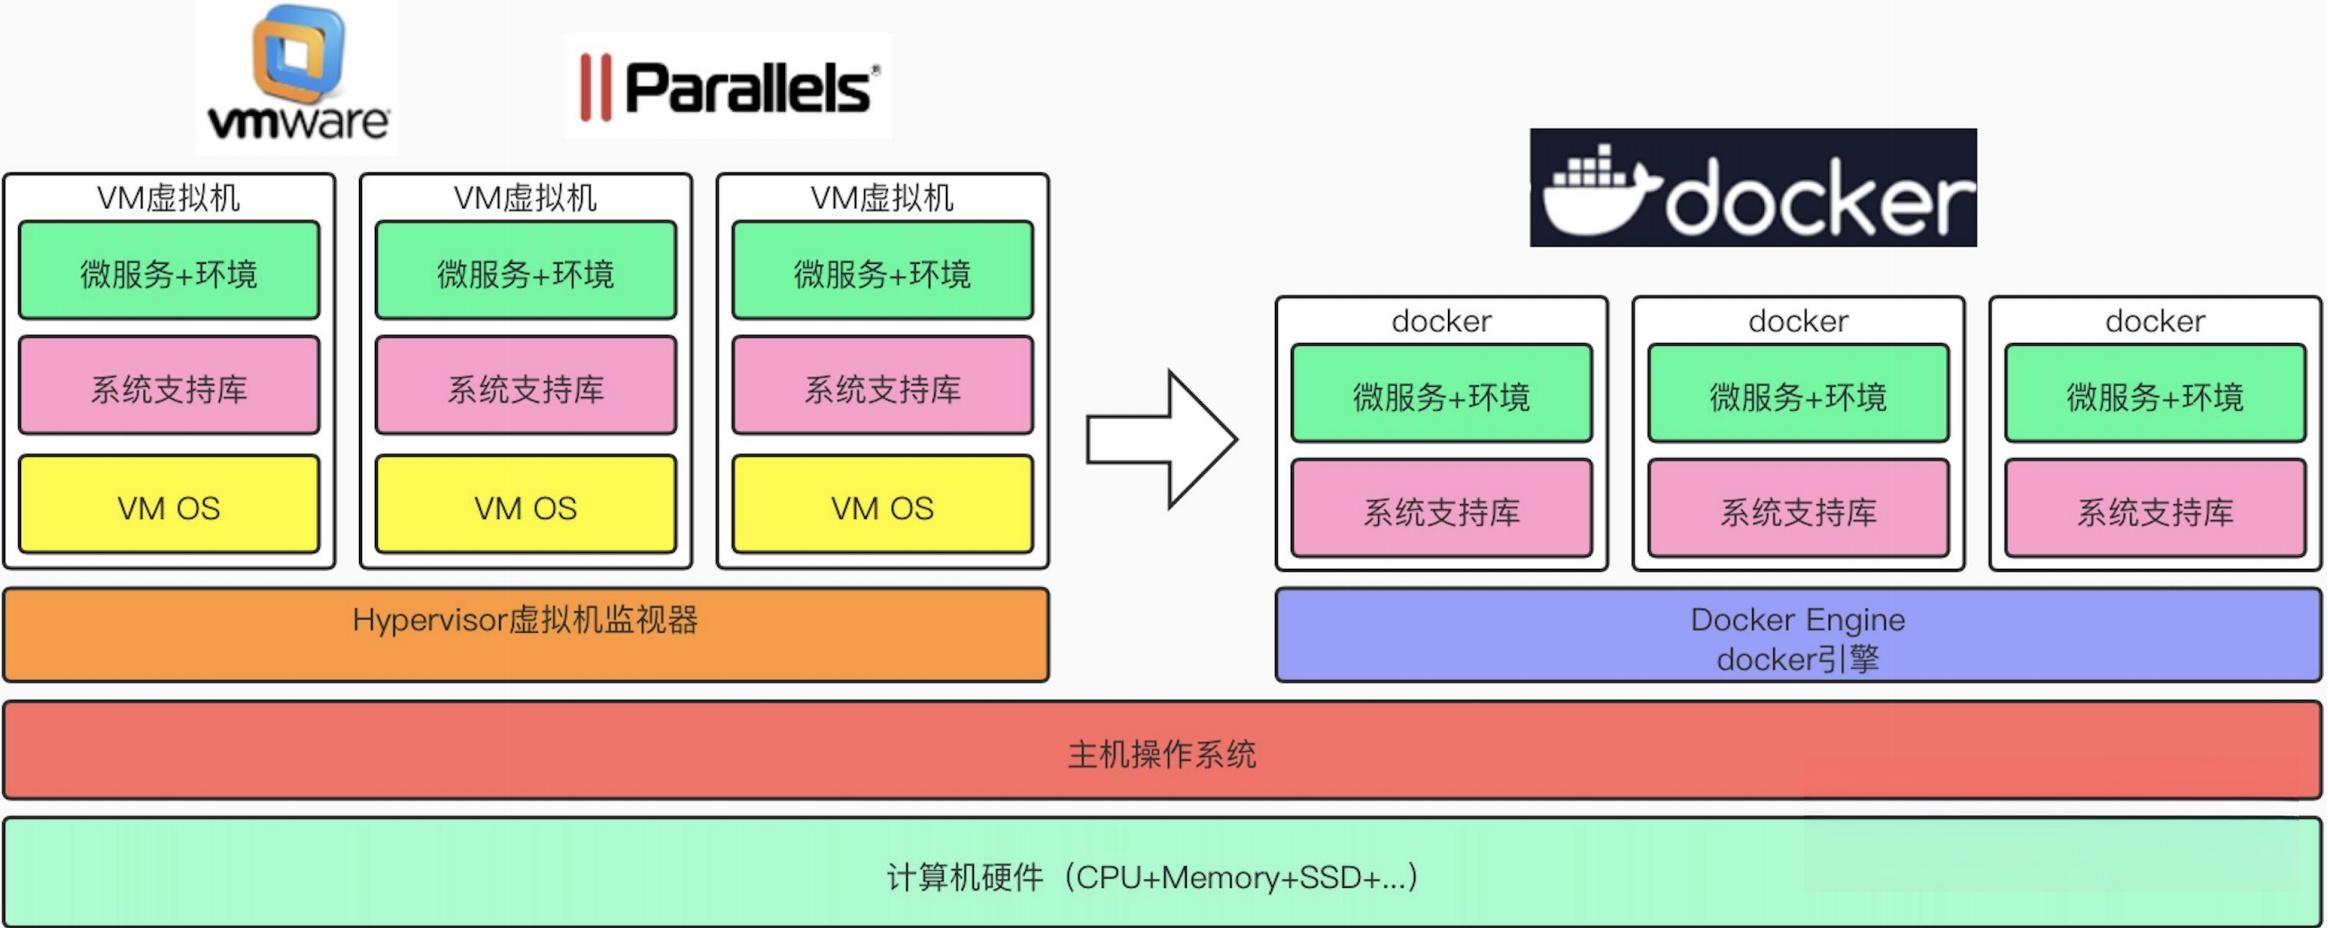
Docker 利用的是宿主机的内核,当启动一个容器时,不需要再像虚拟机一样加载一个操作系统内核。大大提升了加载时间。
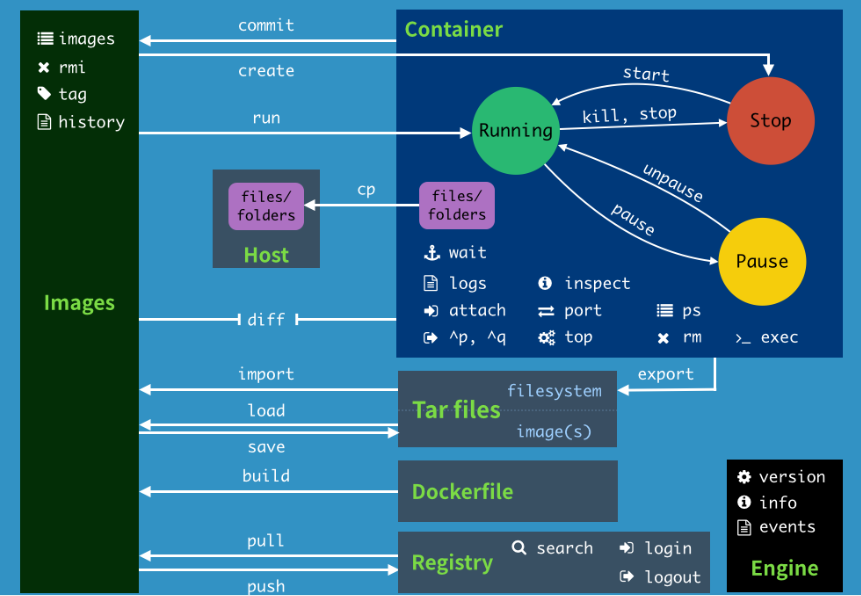
Docker 常用命令
(一)帮助命令
docker version # 查看 docker 版本信息
docker info # 查看 docker 系统信息
docker --help # 查看帮助信息
docker <command> --help # 查看某个命令的具体帮助信息
(二)镜像命令
1. docker images 查看镜像列表
[root@iZ2ze41p5bh3hk80pucxofZ ~]# docker images
REPOSITORY    TAG       IMAGE ID       CREATED       SIZE
hello-world   latest    feb5d9fea6a5   3 years ago   13.3kB

# 说明
# REPOSITORY   镜像仓库源
# TAG          镜像标签(版本)
# IMAGE ID     镜像ID
# CREATED      镜像创建时间
# SIZE         镜像大小

# options
# -a 显示所有镜像(包含隐藏的镜像)
# -q 只显示镜像ID
# --digests 显示唯一标识镜像的哈希值
# -f 过滤镜像
# --format <string> 配置镜像列表的显示格式(默认使用 “table” 进行展示,还有一种是 “json” 字符串的形式)
2. docker search <repository_name> 从 Docker Hub 搜索镜像
⚠️这里有个问题就是即使配置了镜像,docker search 还是会走国外的 index.docker.io,开代理也不一定管用。可以在 search 的时候加上国内镜像源。写此文的时候这个是可用的 docker search docker-0.unsee.tech/mysql。此镜像源网站地址
[root@iZ2ze41p5bh3hk80pucxofZ ~]# docker search docker-0.unsee.tech/mysql
NAME                   DESCRIPTION                                     STARS     OFFICIAL
mysql                  MySQL is a widely used, open-source relation…   15893     [OK]
bitnami/mysql          Bitnami container image for MySQL               141
circleci/mysql         MySQL is a widely used, open-source relation…   32
bitnamicharts/mysql    Bitnami Helm chart for MySQL                    0
cimg/mysql                                                             3
ubuntu/mysql           MySQL open source fast, stable, multi-thread…   70
google/mysql           MySQL server for Google Compute Engine          26
...

# options
# --filter 过滤搜索结果
# --limit <number> 限制搜索结果条数

[root@iZ2ze41p5bh3hk80pucxofZ ~]# docker search docker-0.unsee.tech/mysql --filter=stars=50
NAME                  DESCRIPTION                                     STARS     OFFICIAL
mysql                 MySQL is a widely used, open-source relation…   15893     [OK]
bitnami/mysql         Bitnami container image for MySQL               141
ubuntu/mysql          MySQL open source fast, stable, multi-thread…   70
mysql/mysql-server    Optimized MySQL Server Docker images. Create…   1032
mysql/mysql-cluster   Experimental MySQL Cluster Docker images. Cr…   100
3. docker pull <respository_name>[:tag] 从 Docker Hub 拉取镜像
[root@iZ2ze41p5bh3hk80pucxofZ ~]# docker pull mysql
Using default tag: latest
latest: Pulling from library/mysql
72a69066d2fe: Pull complete
93619dbc5b36: Pull complete
99da31dd6142: Pull complete
626033c43d70: Pull complete
37d5d7efb64e: Pull complete
ac563158d721: Pull complete
d2ba16033dad: Pull complete
688ba7d5c01a: Pull complete
00e060b6d11d: Pull complete
1c04857f594f: Pull complete
4d7cfa90e6ea: Pull complete
e0431212d27d: Pull complete
Digest: sha256:e9027fe4d91c0153429607251656806cc784e914937271037f7738bd5b8e7709
Status: Downloaded newer image for mysql:latest
docker.io/library/mysql:latest # 真实地址

# 不加 tag 的情况下,默认是 latest,最新版本
# 可以看出,镜像也是一层一层拉取的
# Digest:唯一标识镜像的哈希值。也可以根据 Digest 进行镜像拉取

# 拉取指定版本的镜像
[root@iZ2ze41p5bh3hk80pucxofZ ~]# docker pull mysql:8.0
8.0: Pulling from library/mysql
Digest: sha256:e9027fe4d91c0153429607251656806cc784e914937271037f7738bd5b8e7709
Status: Downloaded newer image for mysql:8.0
docker.io/library/mysql:8.0
4. docker rmi <image_id> ... 删除镜像
相当于 docker image rm <image_id>
[root@iZ2ze41p5bh3hk80pucxofZ ~]# docker rmi feb5d9fea6a5
Error response from daemon: conflict: unable to delete feb5d9fea6a5 (must be forced) - image is being used by stopped container dee1619f4d37
[root@iZ2ze41p5bh3hk80pucxofZ ~]# docker rmi -f feb5d9fea6a5
Untagged: hello-world:latest
Untagged: hello-world@sha256:2498fce14358aa50ead0cc6c19990fc6ff866ce72aeb5546e1d59caac3d0d60f
Deleted: sha256:feb5d9fea6a5e9606aa995e879d862b825965ba48de054caab5ef356dc6b3412

# options
# -f 强制删除镜像(如果作为正在运行容器的镜像是无法直接删除的,可通过 -f 强制删除)

# 递归删除全部镜像
docker rmi -f $(docker images -qa)
(三)容器命令
运行镜像会生成容器。
1. docker run <image_id or image:tag> [command][args] 新建容器并启动
# options
# --add-host
# --expose 对外暴露端口号或端口号范围区间
# -d 后台运行容器并打印containerID
# -P 随机端口号映射
# -p 指定端口号映射
# -i 以交互模式运行容器
# -t 给容器重新分配一个终端,通常和 -i 一起使用

[root@iZ2ze41p5bh3hk80pucxofZ nginx]# docker run -it centos /bin/bash
# 已经进入了容器
[root@4eee4f14dc3e /]# ls
bin  dev  etc  home  lib  lib64  lost+found  media  mnt  opt  proc  root  run  sbin  srv  sys  tmp  usr  var
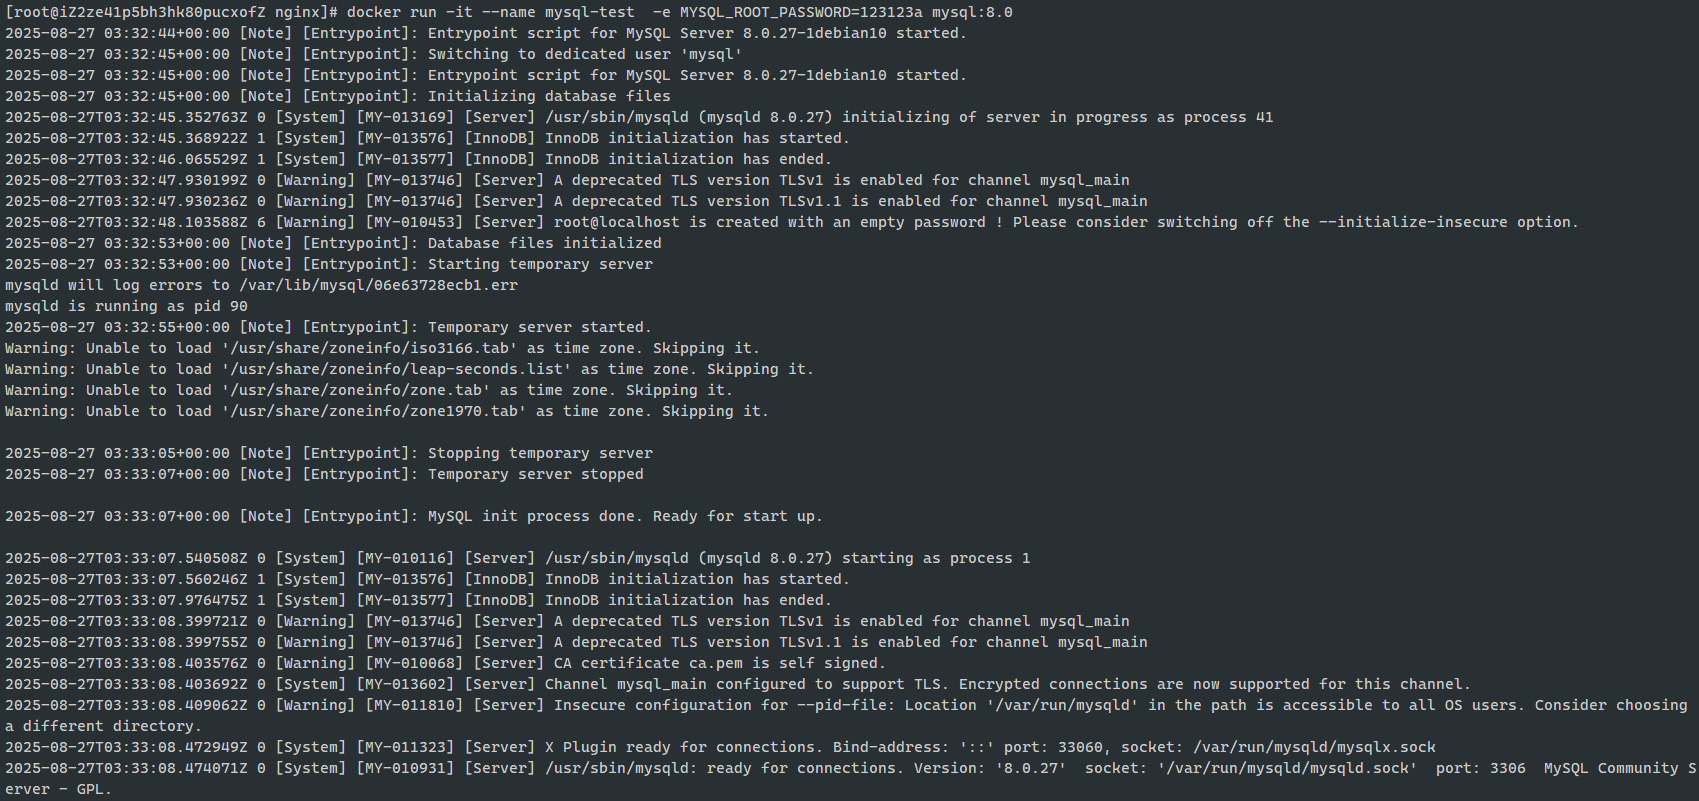
Docker 容器后台运行,就必须有一个前台进程,容器运行的命令如果不是那些一直挂起的命令,就会自动退出:
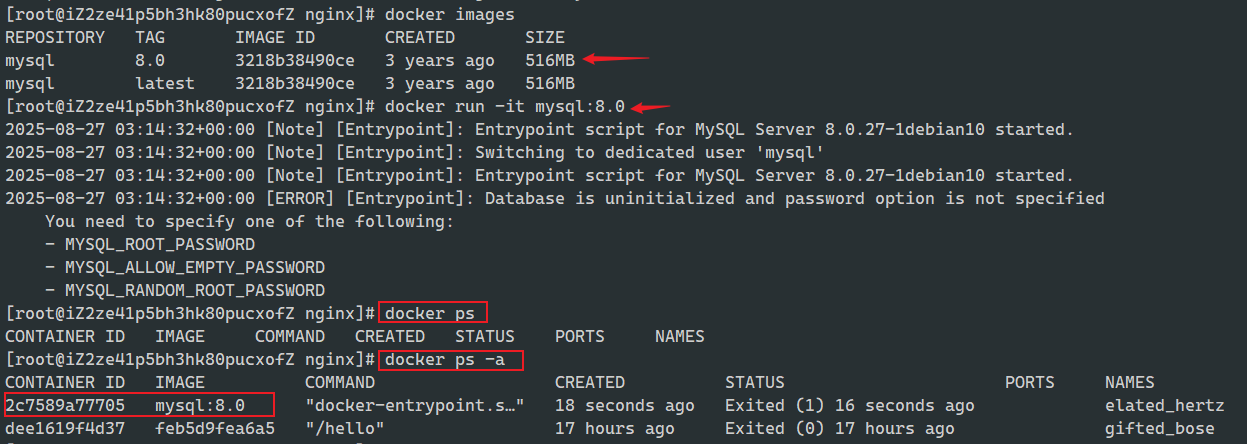
上述提示需要配置一个密码:
退出:Ctrl+P+Q(不停止运行)
2. docker ps 查看正在运行的容器列表
# options
# -a 查看所有运行的容器(正在运行容器 + 历史运行容器)
# -f 按条件过滤容器
# -n=<number> 显示最近创建的 number 个容器
# -s, --size 显示容器占用磁盘空间大小(size为容器可写层数据量,virtual为可写层使用的只读image数据大小)
# -q 只显示容器ID

# 查看正在运行的容器
[root@iZ2ze41p5bh3hk80pucxofZ nginx]# docker ps
CONTAINER ID   IMAGE       COMMAND                  CREATED          STATUS          PORTS                 NAMES
06e63728ecb1   mysql:8.0   "docker-entrypoint.s…"   10 minutes ago   Up 10 minutes   3306/tcp, 33060/tcp   mysql-test

# 查看所有容器
[root@iZ2ze41p5bh3hk80pucxofZ nginx]# docker ps -a
CONTAINER ID   IMAGE       COMMAND                  CREATED          STATUS                      PORTS                 NAMES
be1e629fd9a4   mysql:8.0   "docker-entrypoint.s…"   30 minutes ago   Exited (1) 30 minutes ago                         mysql-test01
06e63728ecb1   mysql:8.0   "docker-entrypoint.s…"   37 minutes ago   Up 37 minutes               3306/tcp, 33060/tcp   mysql-test
3. 退出容器
Ctrl+P+Q 退出容器(不停止运行) exit 退出容器并停止运行
4. docker rm <container_name or container_id> ... 删除容器
docker rm -f $(docker ps -a -q)  # 删除所有容器
docker ps -a -q|xargs docker rm  # 删除所有容器

# options
# -f 强制删除
# -v 同时删除容器的匿名挂载

[root@iZ2ze41p5bh3hk80pucxofZ nginx]# docker rm mysql-test
Error response from daemon: cannot remove container "/mysql-test": container is running: stop the container before removing or force remove
[root@iZ2ze41p5bh3hk80pucxofZ nginx]# docker rm mysql-test01
mysql-test01
[root@iZ2ze41p5bh3hk80pucxofZ nginx]# docker rm -f mysql-test
mysql-test

[root@iZ2ze41p5bh3hk80pucxofZ nginx]# docker rm -f $(docker ps -aq)
ec78605f81b5
b3a10b9c3468
96a28deeaa15
5. Linux命令
docker start <container_name or container_id>    # 启动容器
docker stop <container_name or container_id>     # 停止容器
docker restart <container_name or container_id>  # 重启容器
docker kill <container_name or container_id>     # 强制停止容器运行
(四)其他命令
1. -d 后台启动容器
[root@iZ2ze41p5bh3hk80pucxofZ nginx]# docker run -d -it --name centos-test01 centos /bin/bash
b3a10b9c34685b823df6ee8027ab96d86ea31f8636bf1d1692f3a06c3c41d1a0
[root@iZ2ze41p5bh3hk80pucxofZ nginx]# docker ps
CONTAINER ID   IMAGE     COMMAND       CREATED         STATUS        PORTS     NAMES
b3a10b9c3468   centos    "/bin/bash"   3 seconds ago   Up 1 second             centos-test01
2. docker logs <container_name or container_id> 查看容器日志
# options
# --detail 显示日志详情
# --since <timestamp_string or relative_string> eg:"2013-01-02T13:23:37Z","42m" 表示前 42 minutes 期间
# -n, --tail <number> 显示指定 number 条数的日志
# -t 显示时间戳
# -f 显示实时日志(动态,最新)

# 运行容器,循环输出10次hello
[root@iZ2ze41p5bh3hk80pucxofZ nginx]# docker run -d --name centos-test02 centos /bin/sh -c "for i in {1..10}; do echo hello; done"
ec78605f81b507448f3cd9583c1c5d3a28cfb38272abb436a2e3fc5bffb3a918
[root@iZ2ze41p5bh3hk80pucxofZ nginx]# docker logs centos-test02
hello
hello
hello
hello
hello
hello
hello
hello
hello
hello
[root@iZ2ze41p5bh3hk80pucxofZ nginx]# docker logs -n 2 centos-test02
hello
hello
3. docker top <container_id or container_name> 查看容器中运行的进程信息
相当于 docker container top <container_id or container_name>
# 没有正在运行的容器会报错
[root@iZ2ze41p5bh3hk80pucxofZ nginx]# docker top centos-test
Error response from daemon: container 7b6f6e475a61cfe47f45b800ed105d046505943bc2cde7a4aa23254d8461ebdf is not running
[root@iZ2ze41p5bh3hk80pucxofZ nginx]# docker top c724a243509e
UID                 PID                 PPID                C                   STIME               TTY                 TIME                CMD
root                48919               48899               0                   13:14               pts/0               00:00:00            /bin/bash
4. docker inspect <image_ or container_> 查看容器/镜像的元数据
# 查看镜像数据
[root@iZ2ze41p5bh3hk80pucxofZ nginx]# docker inspect mysql:8.0
[
    {
        "Id": "sha256:3218b38490cec8d31976a40b92e09d61377359eab878db49f025e5d464367f3b",
        "RepoTags": [
            "mysql:8.0",
            "mysql:latest"
        ],
        "RepoDigests": [
            "mysql@sha256:e9027fe4d91c0153429607251656806cc784e914937271037f7738bd5b8e7709"
        ],
        "Config": {
            "ExposedPorts": {
                "3306/tcp": {},
                "33060/tcp": {}
            },
            "Volumes": {
                "/var/lib/mysql": {}
            },
            "RootFS": {
                "Type": "layers",
                "Layers": [ # 分层
                    "sha256:ad6b69b549193f81b039a1d478bc896f6e460c77c1849a4374ab95f9a3d2cea2",
                    "sha256:fba7b131c5c350d828ebea6ce6d52cdc751219c6287c4a7f13a51435b35eac06",
                    "sha256:0798f2528e8383f031ebd3c6d351f7d9f7731b3fd12007e5f2fdcdc4e1efc31a",
                    "sha256:a0c2a050fee24f87fde784c197a8b3eb66a3881b96ea261165ac1a01807ffb80",
                    "sha256:d7a777f6c3a4ded4667f61398eb1f9b380db07bf48876f64d93bf30fb1393f96",
                    "sha256:0d17fee8db40d61d9ca0d85bff8b32ef04bbd09d77e02cc67c454c8f84edb3d8",
                    "sha256:aad27784b7621a3e58bd03e5d798e505fb80b081a5070d7c822e41606b90a5c0",
                    "sha256:1d1f48e448f9b8abb9a2aad1e76d4746b69957882d1ddb9c11115302d45fcbbd",
                    "sha256:c654c2afcbba8c359565df63f6ecee333c9cc6abaeaa39838b05b4465a82758b",
                    "sha256:118fee5d988ac2057ab66d87bbebd1f18b865fb02a03ba0e23762af5b55b0bd5",
                    "sha256:fc8a043a3c7556d9abb4fad3aefa3ab6a5e1c02abda5f924f036c696687d094e",
                    "sha256:d67a9f3f65691979bc9e2b5ee0afcd4549c994f13e1a384ecf3e11f83d82d3f2"
                ]
            }
            ...
       }
  ...
]

# 查看容器数据
[root@iZ2ze41p5bh3hk80pucxofZ nginx]# docker inspect c724a243509e
[
    {
        "Id": "c724a243509e68fcbf5a676322af591b969495a54da887875278561fa4f24a6f",
        "Created": "2025-08-27T05:14:18.923716866Z",
        "Path": "/bin/bash",
        "Args": [],
        "State": {
            "Status": "running",
            "Running": true,
            "Paused": false,
            "Restarting": false,
            "OOMKilled": false,
            "Dead": false,
            "Pid": 48919,
            "ExitCode": 0,
            "Error": "",
            "StartedAt": "2025-08-27T05:14:19.658010815Z",
            "FinishedAt": "0001-01-01T00:00:00Z"
        },
        "Image": "sha256:5d0da3dc976460b72c77d94c8a1ad043720b0416bfc16c52c45d4847e53fadb6",
        "Mounts": [],
        "Config": {
            "Hostname": "c724a243509e",
            "Domainname": "",
            "User": "",
            "AttachStdin": false,
            "AttachStdout": false,
            "AttachStderr": false,
            "Tty": true,
            "OpenStdin": true,
            "StdinOnce": false,
            "Env": [
                "PATH=/usr/local/sbin:/usr/local/bin:/usr/sbin:/usr/bin:/sbin:/bin"
            ],
            "Cmd": [
                "/bin/bash"
            ],
            "Image": "centos",
            "Volumes": null,
            ...
        }
     ...
    }
]
5. 进入正在运行的容器
docker exec -it <container_id or container_name> <Command> [args] 进入容器时会新建终端
docker attach <container_id or container_name> 直接显示容器运行终端
[root@iZ2ze41p5bh3hk80pucxofZ nginx]# docker exec -it c724a243509e /bin/bash
[root@c724a243509e /]#
# 查看当前系统中所有正在运行的进程
[root@c724a243509e /]# ps -ef
UID          PID    PPID  C STIME TTY          TIME CMD
root           1       0  0 05:14 pts/0    00:00:00 /bin/bash
root          20       0  0 05:33 pts/1    00:00:00 /bin/bash
root          35      20  0 05:34 pts/1    00:00:00 ps -ef

[root@iZ2ze41p5bh3hk80pucxofZ nginx]# docker attach c724a243509e
[root@c724a243509e /]#
6. 主机和容器之间文件拷贝
docker cp <container:src_path> <dest_path> 将容器文件拷贝到主机
docker cp <dest_path> <container:src_path> 将主机文件拷贝到容器
# 在容器中创建 test.json 文件(镜像体积最小化,因此某些命令是不能使用的,需要在容器内安装才可以使用,这里只能用 vi)
[root@c724a243509e /]# vi test.json
[root@c724a243509e /]# ls
bin  dev  etc  home  lib  lib64  lost+found  media  mnt  opt  proc  root  run  sbin  srv  sys  test.json  tmp  usr  var
# 退出容器
[root@iZ2ze41p5bh3hk80pucxofZ /]# cd /var/local
# 拷贝容器内文件到主机
[root@iZ2ze41p5bh3hk80pucxofZ local]# docker cp c724a243509e:/test.json .
Successfully copied 1.54kB to /var/local/.
[root@iZ2ze41p5bh3hk80pucxofZ local]# ls
my-blog  selfSignedCertificate  test.json  WebRTCServerTest

[root@iZ2ze41p5bh3hk80pucxofZ local]# mkdir test01.json
[root@iZ2ze41p5bh3hk80pucxofZ local]# ls
my-blog  selfSignedCertificate  test01.json  WebRTCServerTest
# 拷贝主机文件到容器内
[root@iZ2ze41p5bh3hk80pucxofZ local]# docker cp test01.json c724a243509e:/
Successfully copied 1.54kB to c724a243509e:/
[root@iZ2ze41p5bh3hk80pucxofZ local]# docker attach c724a243509e
[root@c724a243509e /]# ls
bin  dev  etc  home  lib  lib64  lost+found  media  mnt  opt  proc  root  run  sbin  srv  sys  test01.json  tmp  usr  var
总结
练习
1. 拉取并运行 nginx
docker search nginx
docker pull nginx
docker images
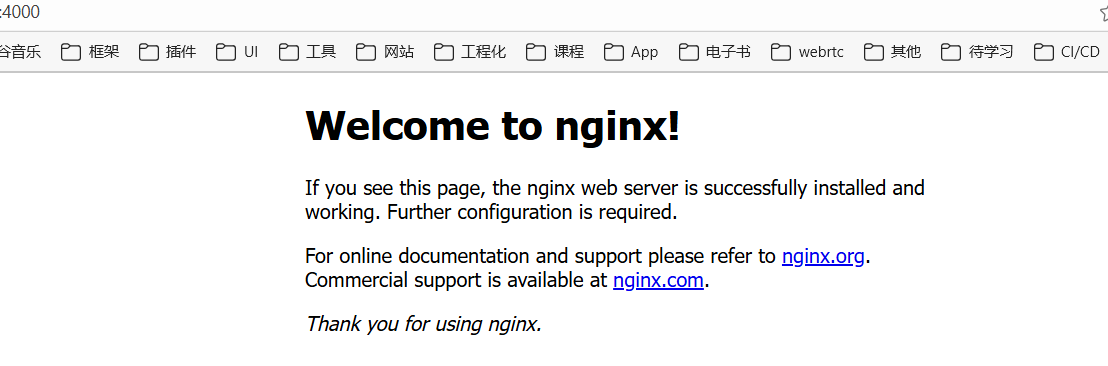
# 运行 nginx,向外映射端口为4000
[root@iZ2ze41p5bh3hk80pucxofZ local]# docker run -d -p 4000:80 --name nginx-test nginx
# 或者直接在浏览器中访问 http:<公网IP>:4000 也可以查看到 nginx 默认页面
[root@iZ2ze41p5bh3hk80pucxofZ local]# curl localhost:4000
<!DOCTYPE html>
<html>
<head>
<title>Welcome to nginx!</title>
<style>
html { color-scheme: light dark; }
body { width: 35em; margin: 0 auto;
font-family: Tahoma, Verdana, Arial, sans-serif; }
</style>
</head>
<body>
<h1>Welcome to nginx!</h1>
<p>If you see this page, the nginx web server is successfully installed and
working. Further configuration is required.</p>
<p>For online documentation and support please refer to
<a href="http://nginx.org/">nginx.org</a>.<br/>
Commercial support is available at
<a href="http://nginx.com/">nginx.com</a>.</p>
<p><em>Thank you for using nginx.</em></p>
</body>
</html>
[root@iZ2ze41p5bh3hk80pucxofZ local]# docker exec -it nginx-test /bin/bash
root@9f0579a6a789:/# cd /usr/share/nginx/html
root@9f0579a6a789:/usr/share/nginx/html# cat index.html
<!DOCTYPE html>
<html>
<head>
<title>Welcome to nginx!</title>
<style>
html { color-scheme: light dark; }
body { width: 35em; margin: 0 auto;
font-family: Tahoma, Verdana, Arial, sans-serif; }
</style>
</head>
<body>
<h1>Welcome to nginx!</h1>
<p>If you see this page, the nginx web server is successfully installed and
working. Further configuration is required.</p>
<p>For online documentation and support please refer to
<a href="http://nginx.org/">nginx.org</a>.<br/>
Commercial support is available at
<a href="http://nginx.com/">nginx.com</a>.</p>
<p><em>Thank you for using nginx.</em></p>
</body>
</html>
这种方式访问需要防火墙开4000端口: